This thing has no trunk (boot for you folks in the UK)
Over the last few years, as I have immersed myself in steam, I have studied the various original configurations and replications of the Locomobile early models a well some of the early Stanleys.
One thing I see is that any extra "stuff" gets strapped to the running boards, on the back somewhere, or piled on the rear deck. I looked into some type of side mounting on the lower frame members, or any place else. I did not like the way it might look on either of the sides. As I said in the previous post, I am expecting a wicker basket/box to mount on the back over the burner. I know there will be space in there for some items, but I wanted to carry more items that might be needed on a "tour" occasionally, like tools, jack, spare tire tubes, as opposed to things like an oil can or canvas water bucket that would be needed to be accessed more often.
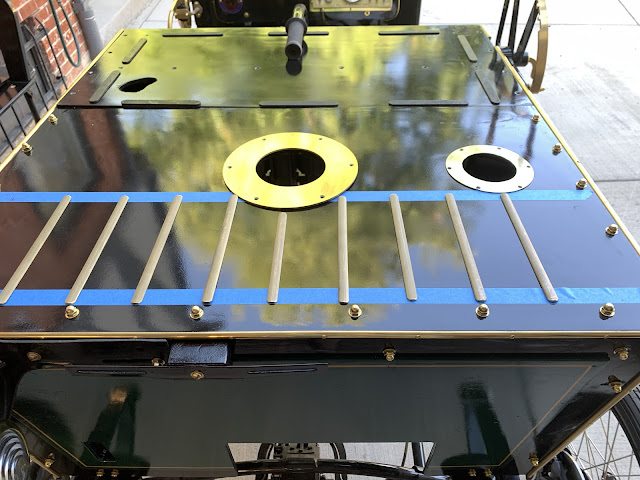
So I decided to make a rear deck luggage rack with leather straps to hold some type of trunk or box. I have a number of wood camping boxes from my days as a buck-skinner, (1985 era) but those were just a bit too wide to fit and look nice.
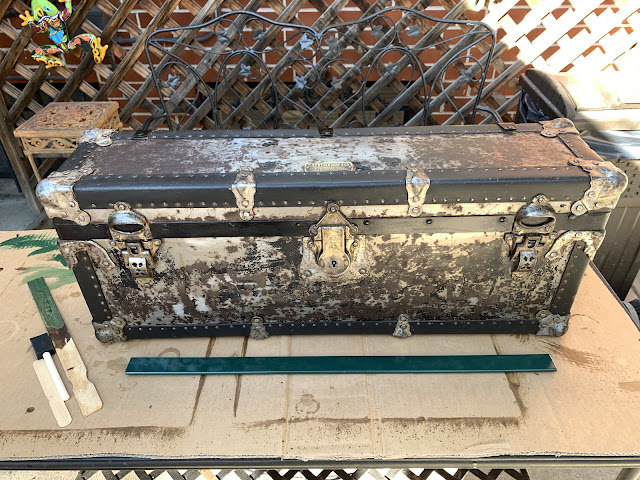
A search on Ebay yielded a once-in-a-lifetime find. It was listed as a machinist tool box. In fact it was a steamer type trunk from the 1900's made by a luggage company in Chicago, Kuntzendorf & Co. It has seen better days, and had been painted, including the leather corner bands. But at a princely sum of $35.00 I could not pass it up. One week later, it was sitting on a table in front of me.
At 29 inches long, 7 inches wide and 12 inches tall the trunk is the perfect size to fit on the read deck. I wanted to experiment a little with paint, and needed to find a "Brush-on" version of the BRG (British Racing Green) paint I used on the engine and also the side louvers. I rolled the dice and ordered a can of Dark Hunter Green (Rustoleum) from the local DIY store (Home Depot) and then proceeded to see if I could strip the paint off. I was a little worried about the leather on the corners, but it turns out it is almost a raw-hide thickness and stood up to the paint stripper. Of course I used the Citrus-Strip that does not eat flesh as I figured it might leave the leather intact.
After stripping the paint, then scrubbing the result, and finally sanding the flat surface and using a dremel on the corner pieces, the real look of the trunk starts to emerge. I used some satin black paint on the horizontal bands as well as the hinges. The leather was treated with a classic car leather restorer.
At the same time, I used some of my epoxy wood treatment (same as I used as a primer on the body panels) to coat and stabilize the insides of the box.
While I was waiting for the paint to come in, I went in search of some leather luggage rack straps. On Ebay I found a company - Leiberings Leatherworks. https://www.ebay.com/str/leiberingsleatherworks
They have a selection of products but I needed some specific lengths of straps, plus I wanted a total of three straps - a private conversation yielded a deal and in short order I had my luggage straps, perfect lengths. Plus they threw in a few extra loops for securing the tails of the straps. Great service.
I then put the trunk in place to locate the loops for securing the straps to the luggage rack area of the rear deck.
The paint finally came in - I managed to get a first couple of coats on before the weather turned cold. The metal sheathing on the trunk is in pretty rough shape, but it took the paint ok. Just shows the age.
The jury is still out on if I paint the corner brackets a Black, or do I just leave them "bright". Starting with them bright. Lots of dents and "character lines".
I think it looks pretty good on the rear deck.
A final note.
Today is October 19, 2024.
The boilers have finally passed all tests. A long road. I hope that STW has their shit together and when my shipment shows up in a month, that I am not missing the "one piece" I need to get the final assembly underway. Winter in Colorado is rapidly approaching. This means I will have to close up the garage part of the shop and move into my basement.
I will probably not post for a while. I have kinda run out of the "extra" things to get in trouble with. The body will stay intact and on the frame until I hear that my next shipment is "in the air". Then I will disassemble the body down to the "studs" (frame) in preparation of working on the pipework,
In the meantime, thanks for reading.


